How to Roll a Classic Joint Step-by-Step
Learning the way to roll a joint the proper way isn’t a precise science. I’m sure you’ve enjoyed some bud in an exceedingly joint that’s just falling apart. (I know I've got, unfortunately)This is more for folks that are looking to urge a decent ground-level thanks to smoke their sticky-icky and perhaps be the designated joint roller at the get-together.
Without further ado, a step-by-step joint rolling guide to creating you are feeling that you simply did right by your green and every one fellow stoner. this can be a no brainer, grab your finest selection of herb and find it into your fancy grinder and acquire to cranking. confirm to carry it, and be grateful for the herb you're on the point of receiving before you grind it into tiny little pieces.
PLEASE don't be the guy/gal that throws in whole pieces of bud and stems into the joint.
You’re probably curious a way to grind weed without a grinder. If you're lacking a grinder, you'll be able to always use something that may cut it up as small as possible. This being a pair of scissors, rolling the bud together with your hands to a crumble. (Please refrain from this, you’re visiting lose plenty of fine THC, and also make your hands hella sticky after you move to roll the joint) Also, a grinder is simply visiting be the foremost efficient thanks to avoiding lumps and having your spliff end in a very horrible canoe accident.
Step 2: Make a Filter (Optional)
It’s really up to you on this step and completely to your benefit if you select to form a filter for a joint. The perks of constructing one include not burning your lips, getting some tiny bits of green in your mouth, and also adds a tad little bit of structure to your joint. (Put some pride in your weed smoking – jeez!)
Ultimately this can be visiting offer you the utmost amount of bud smoking from your joint. I’d recommend finding a little piece of firm paper and make an accordion and fold on one end to make a cylinder.
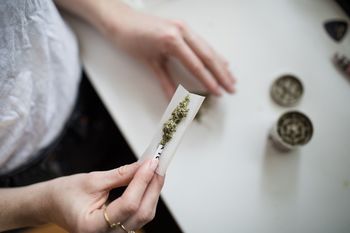
Step 3: Fill Joint cigarette paper with Bud
Now that your weed is nicely variable (and possibly a filter) at now. It’s time to induce some anticipation rolling. Pick a strip of tissue from your favorite brand and on most, you’ll see a touch crease down the center. this can be visiting be your thanks to containing your bud during a little V-trap.
Start by holding on to the paper at one in each of the ends and start sprinkling your flower into the crease. If you made the decision to form a filter let’s put the crutch at the top of 1 of the ends of the paper while you fill the remainder of the paper evenly.
Step 4: Pack the Joint Tight (but not too tight)
Once you’ve spread the bud across the joint evenly, the following step is to shape your masterpiece. to form this happen, you wish to pinch the paper between your fingertips then begin to roll back and forth to form the weed take the form of your paper.
In doing this, you’ll make the ultimate steps seamless as bud will be a pain sometimes, as it’s not evenly shaped everywhere within the joint.
Step 5: Roll Your Joint
Let’s put the ultimate touches on your next soon to be a roach. This step is important to create your joint burn evenly.
Begin with keeping your fingers on the rear of the joint and your texting fingers (thumbs) ahead and begin to slowly roll the paperback and forth along with your thumbs and pointer, and middle fingers. The goal is to urge all of the buds to even out across the full joint. Then you would like to tuck the paper from the front on top of the bud and under the backside of the paper.
Step 6: Finish Your Spliff
Most of the time you’ll find that the tip of the joint could be a bit loose and you may potentially lose some Au out the tip. Packing your weed at the tip makes sure that you simply won’t lose any from a wrong angle. Plus you’ll technically have more bud targeting your greens hit. To do this, you'll be able to use plenty of objects around the house, the general public use pens, or if they're high already, something just like the end of a string on their hoodie. Once it’s nice and tight, march on to the ultimate step.
Step 7: Enjoy Your Rolled Joint
If you're doing a bunch of those directly, we recommend folding or twisting the top of the paper to store them or add a touch of finesse to your greens hit.
If you made it to the present step after rolling a lot of papers, it’s ok. Keep practicing, and shortly you’ll be getting asked by your friends to be the roller once you guys join up.
Once you've got the classic joint avalanche. you'll want to expand to other forms of rolls like, , and other cool joint creations.